
Are you looking for a website, but it doesn’t appear in your search results? That can happen often, and it boils down to your domain name system (DNS) server. Internet service providers (ISPs) or government entities might configure the DNS server to block specific websites. That’s why you keep getting irrelevant search results.
The issue goes beyond internet freedom to affect your online privacy and security.
The situation isn’t hopeless, though. You can easily change your DNS server to access your favorite sites and make your browsing experience snappier, more private, and secure.
You’ll wonder why you didn’t change your DNS sooner!
Let’s define what a DNS does and what issues you face with your ISP’s default DNS server.
What’s a DNS?
Did you watch The Unforgivable on 108.175.32.0/20? You understood the movie’s name, but how about Netflix’s IP address? That’s why you need a DNS.
A Domain Name System (DNS) matches human-friendly domain names to computer-friendly IP addresses.
When you type in a domain name like cyberghost.com, for example, your web browser sends the request to your ISP via your router. Your ISP refers the request to its default DNS server. The DNS server then supplies the relevant IP address so your browser can load the appropriate page.
A DNS also saves a local copy or cache of sites you’ve recently visited on your device for quick and easy reference.
It seems like a streamlined service; what could go wrong? Check the following reasons why you should change your DNS.
Why Should You Change Your DNS?
By default, your device relies on your ISP’s DNS servers to handle these requests, but you have plenty of other DNS services to choose from, like Cloudflare, Cisco OpenDNS, or Google Public DNS. These public DNS servers have a number of advantages over your ISP’s DNS servers.
Get a Speed Boost
When you change your DNS, you speed up your browsing experience. If your ISP-supplied DNS servers are slow or it hasn’t configured them properly for caching, your connection will be slower. Switch to another DNS and you’ll likely enjoy faster loading and lower ping, especially during data-heavy tasks like gaming or streaming.

Shut the Backdoor
Your ISP’s DNS isn’t necessarily secure. DNS services are vulnerable to multiple cyber attacks.
Have you heard of cache poisoning? That’s when cybercriminals redirect your DNS requests from legitimate sites to malicious phishing sites. These sites masquerade as real sites to fool you into submitting your login credentials or financial information.
What about distributed denial-of-service (DDoS) attacks? Cybercriminals launch Distributed Denial of Service (DDoS) attacks against the DNS itself or hijack the DNS to launch DDoS attacks on other systems. A DDoS attack overwhelms a site’s servers with requests, so legitimate traffic can’t get through. This assault of requests can cause the DNS systems and sites to crash.
Plug a Privacy Leak
Your ISP may try to monetize your search activity by selling it to advertisers who use it to target you with personalized ads or search results. ISPs may also divert your unresolved search queries to search engines or advertiser sites. That’s a blatant privacy breach, but that doesn’t stop your ISP from doing it.
Access Target Websites
ISPs use their DNS servers to block sites for various reasons. They may be trying to make their service more family-friendly. Alternatively, they may be obligated to block sites to adhere to government content filtering or censorship laws. When you change your DNS from the one your ISP gives you, you can get around censorship and access your favorite sites.
Benefit from Public DNS Features
Specialized third-party DNS providers can offer many useful features. Some allow you to set parental controls to keep age-inappropriate content off your children’s devices. If you’re a business owner or school network admin, changing your DNS helps you filter out work or school-inappropriate content.
Better speeds, less censorship, more security and privacy, and a range of useful features… Now that you know why you should change your DNS, here’s how.
How to Change Your DNS
You’ll find many reliable third-party DNS providers to choose from, offering different features and benefits. The most common, as mentioned, are Google DNS and Cloudflare.
Google Public DNS offers a secure, fast, and free alternative to your ISP’s DNS. Web infrastructure giant Cloudflare’s DNS is even faster than Google’s and far faster than your ISP’s. It’s also more secure and private too. Unlike most DNS resolvers, Cloudflare doesn’t sell your data to advertisers and deletes all logs every 24 hours.
Make a note of these IP addresses and enter them when you’re ready to change to the new DNS server.
For Google DNS: 8.8.8.8 or 8.8.4.4
For Cloudflare: 1.1.1.1 or 1.0.0.1
To change your DNS manually on your device, follow the step-by-step instructions below. Easier still, download the CyberGhost VPN app. CyberGhost gives you instant access to a safe, private, and fast DNS without complicated setup on both mobile and desktops.

On Windows 10
Follow these 11 steps to change your DNS in Windows 10:
- Click on the Windows button
- Choose the Settings gear
- Click Network & Internet and select Status
- Scroll down to advanced network settings
- Select Change adapter options
- Right-click the internet connection and choose Properties
- Choose Internet Protocol Version 4 (IPv4) and click the Properties button
- Select Use the following DNS server addresses
- Enter the two new DNS addresses you noted above
- Click Ok
- Repeat the process from Step 6 for Internet Protocol Version 6 (IPv6)

On macOS
Here’s how to change your MacBook’s DNS server in just 7 steps:
- Go to your System Preferences
- Click on the Network icon
- Select your Wi-Fi connection and click Advanced at the bottom right
- Click the DNS tab
- Hit the plus-sign to add both IPv4 and IPv6 DNS addresses
- Remove existing addresses with the minus-sign button
- Click Ok, and you’re all set!
On Your Router
Routers differ in configuration, but generally speaking, it takes 6 steps to change your DNS:
- Check your mobile device or laptop’s connection to get your router’s IP address
- Type it into your browser
- Enter your router login details
- Navigate to the DNS settings (possibly under the WAN tab if you’re connected over Wi-Fi)
- Enter your new DNS addresses
- Restart your router
On Linux
Linux takes a little technical know-how, but you can change your DNS in 3 steps:
- Use a Linux text editor like nano to open resolve.conf. You can also create the file with the following command: sudo nano /etc/resolv.conf
- If the file already includes nameserver lines, simply change the DNS IP addresses. If not, you can add new lines by typing nameserver followed by a space and the new DNS server IP address. Repeat with your second DNS IP address
- Save the file to ensure the changes take effect
On Chromebook
Follow these 4 steps to change DNS servers on a Chromebook:
- Open the Settings app from the quick settings panel
- Select Wi-Fi and your connected Wi-Fi network’s name on the following page
- Select Network to expand network configuration settings
- Under Name servers, select Custom name servers and enter the new DNS IP address
On a Smart TV
Smart TVs are all a little different but here’s how you can change your DNS servers on an Android TV:
- Find the Settings gear on your Smart TV
- Go to Network & Internet, and note down the IP address
- Click on IP settings and switch to Static
- Enter the IP address from step 2
- Enter your Gateway (router) IP address
- The Network prefix length should show 24. If not, then type 24 into the field.
- Enter your first new DNS address followed by the second DNS address
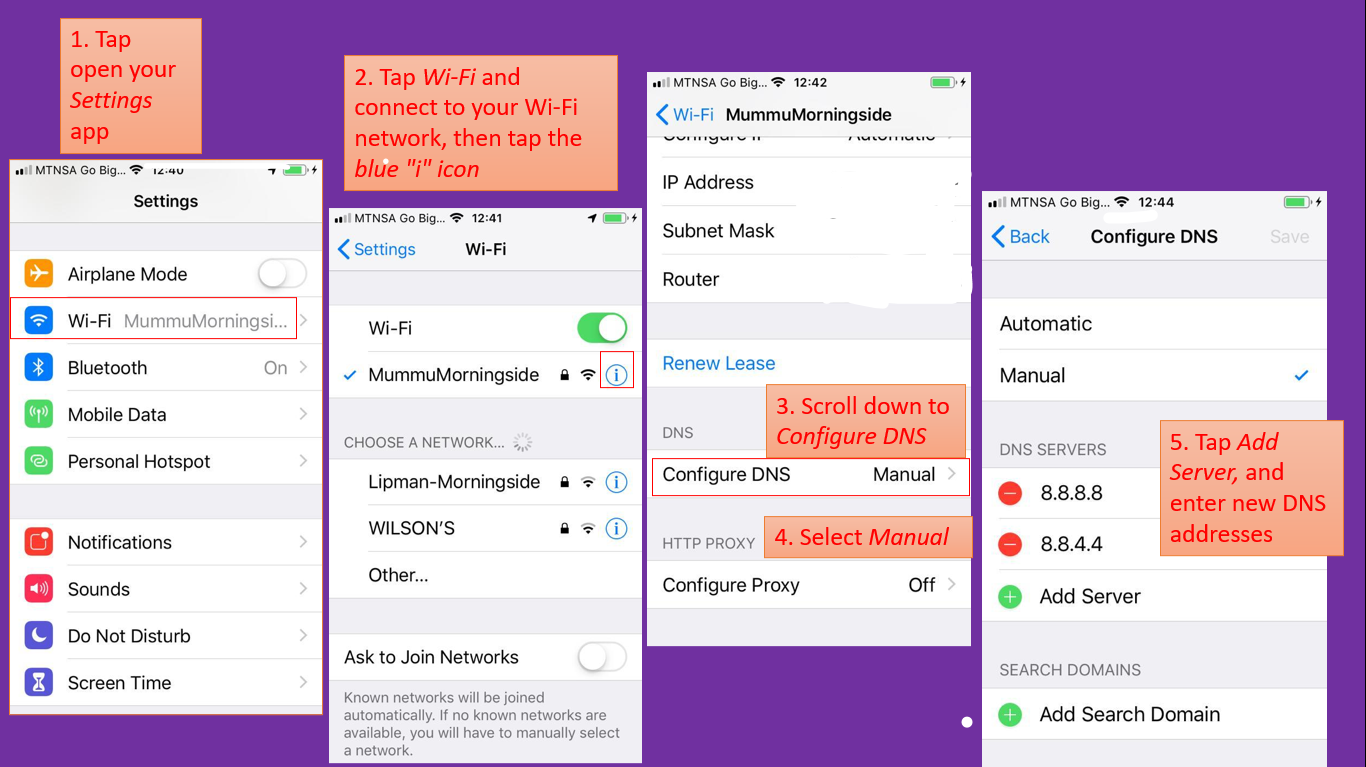
On iOS
iOS is easier than macOS for DNS changes. Simply follow these 5 steps:
- Tap open your Settings app
- Tap Wi-Fi and connect to your Wi-Fi network, then tap the blue “i” icon
- Scroll down to Configure DNS
- Select Manual
- Tap Add Server, and enter the new DNS addresses
On Android
You also have 5 steps to follow to change your DNS on Android:
- Open your device Settings
- Go to Connections and select Wi-Fi
- Tap on the gear icon next to your current network and choose Advanced
- Change IP settings to Static
- Enter the new DNS addresses in the DNS 1 and DNS 2 fields
For mobile devices you’ll have to change your DNS settings every time you connect to a new Wi-Fi network. Alternatively, you could buy a Smart DNS app for a more permanent change.
In that case, you’re probably better off paying for a VPN subscription. It costs a little more, but the advanced security features more than make up for it.
What’s the Difference between a Smart DNS and a VPN?
A Smart DNS service replaces your ISP’s DNS address with one from a different provider. That prevents websites from turning you away since they detect a different location. It doesn’t give you a new IP address — it only changes how a website sees your IP address.
You might be able to visit a variety of previously unavailable websites, but your Smart DNS connection is not secure, nor encrypted. That means ISPs, cybercriminals, and governments can still snoop around and watch your every move.
A virtual private network (VPN) lets you connect to the internet via an encrypted tunnel. Unlike a DNS, a VPN changes your IP address and hides your data through advanced encryption. Most good VPNs also include DNS protection and take over DNS request handling from your ISP.
Smart DNS
| Pros | Cons |
| See previously restricted content | Doesn’t offer encryption |
| Stream at full speed (no encryption slowing you down) | Doesn’t hide your IP, so you’re not safe |
| Cheaper than a VPN | Can be tricky to set up |
| Doesn’t provide many benefits | |
| Can’t bypass firewalls |
VPN
| Pros | Cons |
| Gives you the ability to see previously restricted content | More expensive |
| Encrypts your data so cybercriminals, governments, and ISPs can’t see it | Can slow your connection a little |
| Masks your IP, so you get more privacy | |
| Easy to set up | |
| Offers lots of security functions: malware protection, automatic kill switch, DNS protection etc. |
What if you could have the best of both? A number of premium VPN providers, like CyberGhost include a SmartDNS service as part of their subscription, allowing you to reap the benefits of both.
Why Choose CyberGhost VPN
CyberGhost VPN comes with a highly user-friendly SmartDNS option. If you want speed, privacy, security and to keep visiting the websites you like, you can’t go wrong with CyberGhost VPN.
Top Speeds
ISP throttling and sluggish DNS servers cramping your style? CyberGhost VPN offers you the fastest VPN servers available and we constantly upgrade our global server network to maintain high speeds. You also get unlimited bandwidth!
Improved Digital Privacy
Break free from your ISP’s overreaching control. CyberGhost VPN gives you a new IP address so you can hide your online activity and enjoy a borderless and limitless internet experience.
Our strict No Logs policy means we never record or store any data on your online activity. Even if anyone requests data on you, we have nothing to give! You are free to surf the web without leaving a trace.
Freely Surf the Web with Our Smart DNS
If you simply want to visit streaming websites and aren’t as worried about privacy or security, try our Smart DNS feature. It even works with Smart TVs that don’t natively support a VPN, like the Samsung SmartTV with Tizen OS. With our SmartDNS service, you’ll be able to keep watching streaming services like Netflix and Hulu, even if you’re not at home.
Stay Safe 24/7
If your VPN connection ever shuts down, no worries! CyberGhost VPN’s automatic Kill Switch kicks in and cuts your internet traffic until you regain your VPN connection. Your IP address, location, and all your information benefits from improved protection.
Plug All Leaks
Don’t let DNS leaks give the game away! A leak can happen if your operating system accidentally restores the default DNS settings. That exposes your activity to your ISP and anyone else watching. Activate CyberGhost VPN’s DNS leak protection feature and protect yourself from accidental exposure.
The Bottom Line
Your DNS server is your gateway to the internet, but it also controls your overall surfing experience, privacy, and security. When you change your DNS, you regain control and improve your connection.
That said, a VPN with a Smart DNS feature does all that and more. It encrypts your data so cybercriminals, governments, and ISPs can’t see it. You also benefit from improved online security as your real IP is masked. You can freely surf the worldwide web while taking your privacy and security to the next level.
Download CyberGhost VPN and get all the security features you need to safeguard your digital life. 1 CyberGhost VPN subscription keeps your identity and data safe across all your devices.
FAQ
Yes, but only if you switch to trusted DNS servers. The most popular public DNS providers are Cloudflare and Google DNS. You’re safer online when you change your DNS with a VPN, though, since you’ll keep ISPs, third parties, and cybercriminals from spying on your private browsing data.
Consider CyberGhost VPN. We’ll shield your online identity with end-to-end security on all your devices.
A DNS changer app changes your DNS from the default settings (your ISP’s DNS servers) to a third-party DNS address. That’ll improve your browsing speed and your security. That said, it doesn’t encrypt your data and you’re still a target for snoopers.
A VPN app like CyberGhost can offer better protection. CyberGhost VPN offers you superfast worldwide servers, a Smart DNS feature, a fail-proof Kill Switch, automatic Wi-Fi protection, and much more. Get CyberGhost VPN now and try it risk-free with our 45-day money-back guarantee.
It directs your DNS requests from your ISP’s DNS servers to third-party DNS servers. That means the third-party DNS will translate a domain name like cyberghost.com into a numerical IP address, not your ISP’s DNS.
Changing your DNS can improve your security, give you a speed boost, and gives you the ability to visit previously restricted websites. Contact our 24/7 Customer Support if you need any help changing your DNS.
A DNS leak occurs when your VPN or Smart DNS fails and your DNS requests get routed back to your ISP. Your private browsing data is now exposed.
To check if you have a DNS leak, take our privacy test. You can easily prevent DNS leaks with CyberGhost DNS leak protection. Download CyberGhost VPN and protect up to 7 devices with just 1 subscription.


Leave a comment